![Picture6.svg]](https://kb.opx.io/hubfs/Picture6.svg)
To create a Project from scratch, follow these steps:
Step 1: Access the Projects Page
As an admin, log into your account and navigate to the Projects page. This is where you can create and manage Projects.
%20(39)-1.png?width=331&height=331&name=Ads%C4%B1z%20(1920%20x%201920%20piksel)%20(39)-1.png)
Step 2: Click on "Add Project"
On the Projects page, locate the "Add Project" button and click on it. This will initiate the process of creating a new Project.

Step 3: Choose the Creation Option
You'll be presented with different options for creating your Project. Since you want to create a Project from scratch, select "No" on both drop-down menus to indicate that you're not using existing Learning Journeys or Projects as a template.
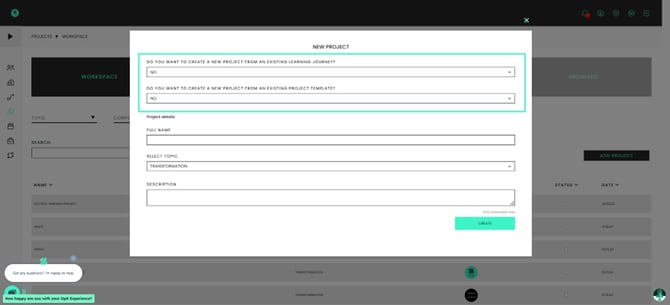
Step 4: Provide Project Details
Enter the name, topic, and description of your Project. These details will help participants understand the purpose and focus of the Project. Take your time to clearly articulate the key aspects of your Project.
Step 5: Add Phases
Phases help structure your Project and provide a roadmap for progress. Add phases by entering their names and descriptions. Each phase represents a distinct stage or milestone within the Project. This helps to organise and track the Project's progress.

Step 6: Define Key Outputs and Checkpoints
Within each phase, you can add key outputs and checkpoints. Key outputs are milestones or deliverables you want to achieve, while checkpoints are criteria that need to be answered "yes" to move forward. Upload documents for key outputs to demonstrate completion or turn them into checkpoints if no document is required.
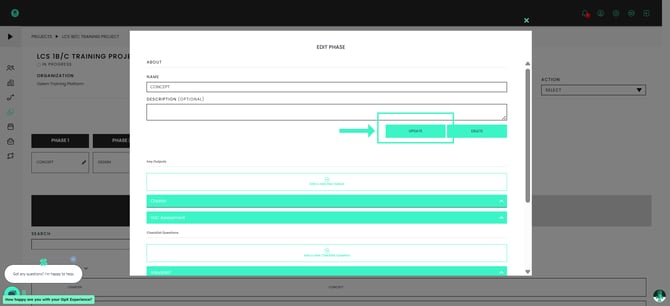
Step 7: Upload Resources
In the resources section, you can upload templates and learning guides that participants can access. These resources enhance the learning experience and provide additional support to participants. Make sure to save your progress after adding each resource. Then, ensure you save your changes by clicking 'Update'.
Step 8: Review and Submit for Approval
Once you have completed building your Project, review the content in each phase, verify the details, and ensure everything is accurate. When you're ready, click on "Action" in the top right corner of the screen and submit the Project for approval. If you don't require approval, you can select "No Approval Needed."
%20(40)-1.png?width=395&height=395&name=Ads%C4%B1z%20(1920%20x%201920%20piksel)%20(40)-1.png)
Step 9: Launch the Project
After approval, the Project will be available in the library. Locate your Project in the library and click on "Create Live Project." Then, select "Launch." Assign participants, a lead, a sponsor, and set start and end dates for each phase.
%20(41)-1.png?width=392&height=392&name=Ads%C4%B1z%20(1920%20x%201920%20piksel)%20(41)-1.png)
Remember that you can make changes to participant assignments and other roles even after the Project has been launched. To make changes to a Project after it has been launched, click on 'Action' and then 'Edit Live Project'.
%20(42)-1.png?width=387&height=387&name=Ads%C4%B1z%20(1920%20x%201920%20piksel)%20(42)-1.png)
By following these steps, you can create a Project from scratch on the OpX platform.
Remember to provide clear descriptions, define key outputs, and upload relevant resources to enhance the learning experience for participants. Regularly review and update the Project as needed to ensure its effectiveness in achieving the desired outcomes.